Lesson 01 · Your First Flow
Three nodes. One tap. Everything else in this course is built on what these three nodes teach.
The problem
The Practice App's dashboard has a Collect button. You want the emulator to tap it — without you touching anything.
That is automation in its smallest possible form: when I run this, the machine performs one action on the screen.
What you will learn
- What a flow is made of: nodes, ports, edges.
- How a run travels from Start to Stop.
- How to place nodes, wire them, save, and run.
- Why every flow should end at an explicit Stop.
Before you start
- The Practice App is open in the emulator at
dashboard.html. - Your instance shows Online on the Instance Dashboard.
The flow
And in the real editor, after Auto Layout:
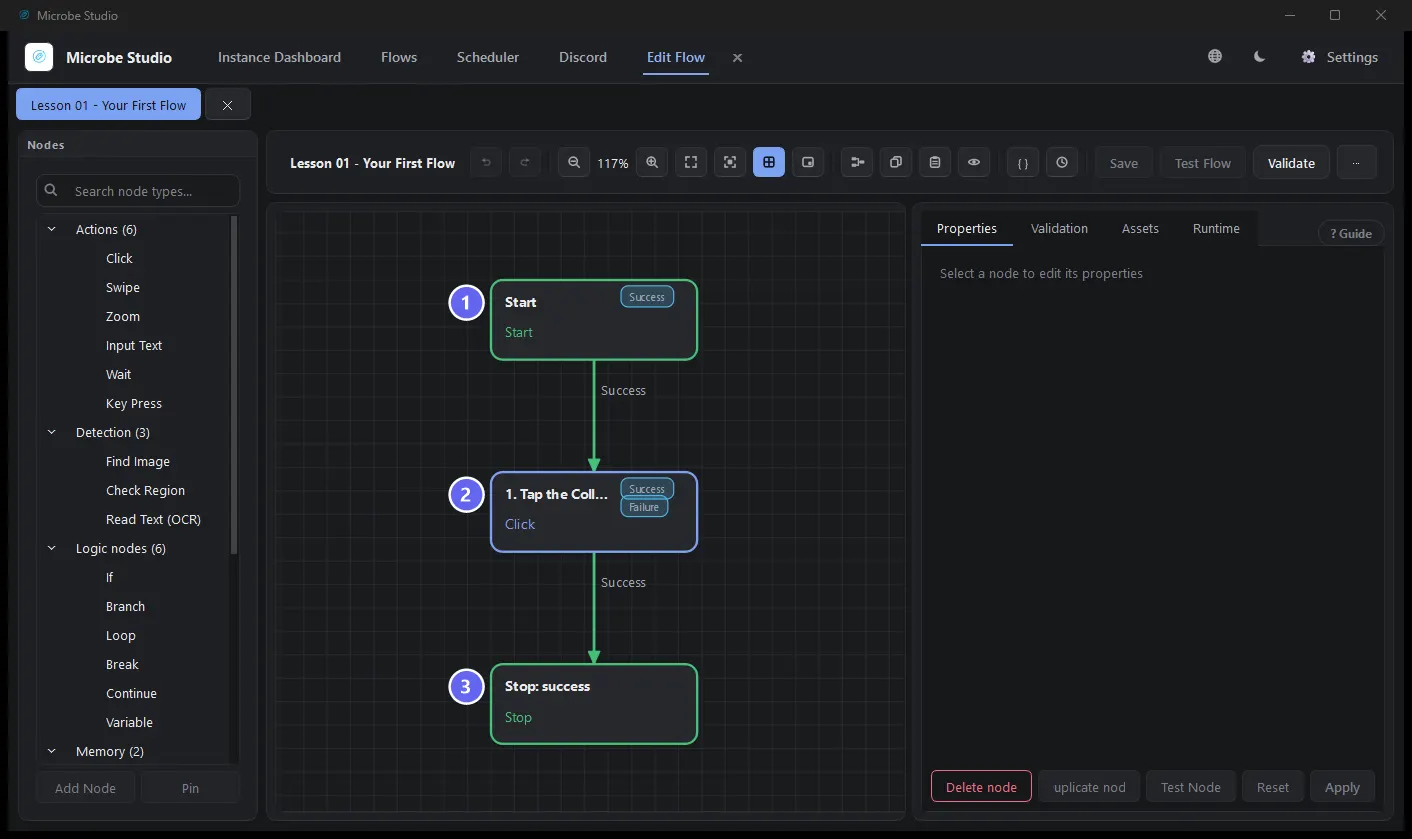
Build it
- On the Flows screen, select Create New Flow. A new flow opens with a Start node already on the canvas — every flow begins with exactly one.
- From the toolbox on the left, under Actions, add a Click node.
- Name it
1. Tap the Collect button. Numbering node names in reading order is a habit worth starting now — on a big canvas it makes the flow readable at a glance. - In the node's Properties panel, set the tap target: draw a Click Region tightly around the Collect button on Live Preview (select Select Directly On Live Preview → Save Region, or type the rectangle in).
- Under Control, add a Stop node. Set Final status to
successand Message toTapped Collect. - Wire it: drag from Start's Success port to the Click node, then from the Click's Success port to the Stop.
- Save, then run Auto Layout (the toolbar button) — let the editor arrange the cards.
Why each node
| Node | Role | What it passes on |
|---|---|---|
| Start | The single entry point. It does nothing itself | Control, through its Success port |
| Click | The one action: taps a random point inside your region | Control; its output records where it tapped |
| Stop | Declares the run's outcome | Nothing — it ends the run with success and your message |
Two ideas hide in this tiny flow:
Ports are exits, edges are roads. A node never decides where the flow goes — it only reports which port it left through. The edge you drew decides what comes next. That separation is why you can rewire a flow without touching any node's settings.
The Click Region taps a random point inside it, every run. Not the centre — a fresh random point each time, so repeated runs don't hammer one pixel. That is also why you keep the region tight to the button.
Run it
Select Run on the flow (or Test Flow in the editor). The runtime:
- Starts a session and sets the current node to Start.
- Start routes Success → the edge leads to your Click.
- Click resolves a random point inside your region, dispatches the tap, routes Success.
- Stop finalizes the run: status
success, messageTapped Collect.
Expected result: in the emulator, the Collect page opens (the button navigates there). The run log shows three executed nodes and ends with your message.
Best practices
- Name nodes for intent, numbered in order —
1. Tap the Collect button, notClick 1. - Keep click regions tight. The random point must always land on the control.
- Always end at a Stop with a message. The message is what you will read in the run log at 2 a.m.
- Auto Layout before you screenshot or share a flow — a tidy canvas is a readable canvas.
Common mistakes
| Mistake | What happens | Fix |
|---|---|---|
| Region drawn loosely around the button | Some runs tap beside it | Tighten the rectangle |
| No Stop node — the flow "just ends" | The run finalizes with TRANSITION_NOT_FOUND instead of your message | Wire every path to a Stop |
| Expecting the flow to wait for the new screen | Click returns the moment the tap is sent | That is Lesson 02 |
Troubleshooting
The run succeeds but nothing was tapped.
The Practice App page probably isn't the frontmost screen in the emulator. Bring dashboard.html to the front and run again.
The run ends with TRANSITION_NOT_FOUND.
A port with no edge was taken. Check that Start → Click → Stop are wired through their Success ports.
The tap lands next to the button. Your region is too large. Redraw it around just the button.
Summary
- A flow is nodes (steps) joined by edges (roads) between ports (exits).
- The runtime walks it one node at a time, Start to Stop.
- A Click taps a random point inside its region and does not wait for the screen to react.
- Every path should end at a Stop that says what happened.
Next
Your tap worked — but the flow only assumed it did. Lesson 02 · Wait and Verify makes the flow prove the screen changed, which is the single most important habit in screen automation.
Also see: Click · Stop · The Execution Model